Nitrogen (N2) is an odorless, colorless, and tasteless gas that makes up most of the Earth’s atmosphere. Nitrogen is located in Period 2 Group 5 of the Periodic Table.
To know more about the Nitrogen molecule, our team spent 48 hours gathering information about the Lewis dot structure of N2.
N2 Lewis Structure: What You Need To Know
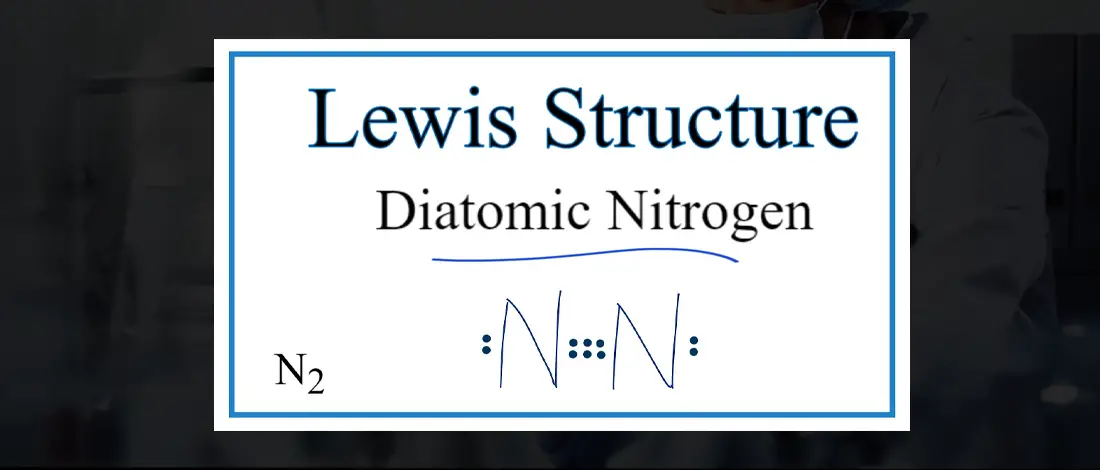
The Lewis structure of the N2 would consist of two Nitrogen atoms connected by a triple bond. The octet rule states that nitrogen atoms must link three times. The N2 molecule is diatomic,
Each Nitrogen atom has one lone pair of electrons. Nitrogen has five valence electrons in the N2 electron dot structure, classified as a group 5 on the periodic table. Align the two Nitrogens and then sandwich two valence electrons between them to make a chemical bond. There will be no center atom in the Lewis structure since both atoms have the same electronegativity.
Since there is no center atom, begin to label atoms with lone pairs. There are four more lone pairs to the label on nitrogen atoms in total. On each nitrogen atom, take note of any remaining lone pairs. One nitrogen atom will take three lone pairs, and the remaining one will take one lone pair.
Steps In Drawing the N2 Lewis Structure
- To create a Lewis structure, determine first the number of valence electrons in each atom. Nitrogen has a total of ten valence electrons—five electrons on its outermost valence shell.
- After determining the total number of valence electrons., connect the atoms between electron pairs. Because both atoms have the same electronegativity value, the structure will not contain a central atom.
- Arrange the ten valence electrons and assign the valence electrons to each atom. Assign valence electrons to each atom using a graphic with five dots around each atom.
- Arrange the remaining electrons and the lone pairs around terminal atoms with other atoms. Also, check for the lone and bonded pairs.
- Make a covalent link between the two Nitrogen atoms by lines. One line equals a single bond. There are two valence electrons in each bond. Each atom’s octet (eight electrons) is completed by sharing three pairs of valence electrons in a bond.
Understanding Its Properties & Structure

N2 Polarity
N2 is a nonpolar molecule with a diatomic structure due to its linear geometrical form. As a result, two atoms have the same electronegativity and share an equal amount of charge. The molecule has a net-zero dipole moment, indicating that it is nonpolar.
N2 Molecular Geometry
N2 creates a triple covalent bond and undergoes sp hybridization. Because each atom has a steric number of two when one triple bond and one lone pair are counted, the diatomic N2 will have a linear molecular geometry and a bond angle of 180°.
Both atoms exert equal influence on the shared bonded atoms as a diatomic molecule, resulting in the nonpolar molecule.
Related Posts:
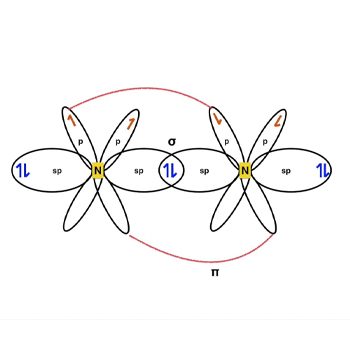
N2 Hybridization
The nitrogen atom’s valence-shell electron configuration is 2s2 2px1 2py1 2pz1.
The arrangement causes N2 sp hybridization.
Three half-filled 2p orbitals exist in the valence shell of the nitrogen atom.
The sp-orbitals of both Nitrogen atoms overlap to create a connection.
The two p-orbitals on each atom, each having one valence electron, form a connection—the next head-to-head overlapping of p-orbitals yields one additional bond.
N2 Bond Angle
Nitrogen is a nonpolar molecule with 180-degree bond angles. Both atoms exert equal impact on the shared bonded electrons as a linear diatomic molecule, resulting in the nonpolar molecule.
N2 Molecular Orbital Diagram
Each molecule has its electron configuration consisting of a sigma bond and a pi bond, known as molecular orbitals. The molecular orbital theory determines the stability order, magnetic nature, and the number of bonds in a molecule. The configuration of N2 is 1S2, *1S2, 2S2, *2S2, 2Px2, 2Py2, 2Pz1, according to the energy level diagram.
FAQS
Nitrogen possesses five valence electrons in its outermost shell; it needs three more valence electrons to complete the octet. A nitrogen atom can complete its octet by sharing three valence electrons with another nitrogen atom, resulting in triple bonds. [1]
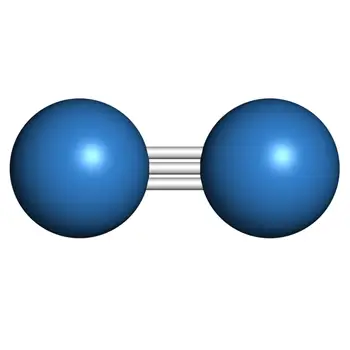
No, N2 does not have a double bond structure. A triple bond exists between two Nitrogen atoms in the N2 Lewis structure. Each bond consists of electron pairs from each connected N atom.
There are six binding electrons in the Lewis structure of N2. This bond connects the two N atoms that comprise one sigma and two π bonds. This bond is made up of two electrons that are shared.
Key Takeaways
In the Lewis structure of Nitrogen, there is a triple bond between nitrogen atoms. According to the octet rule, nitrogen atoms must connect three times. The molecule N2 is diatomic, meaning it is made up of two atoms of the same element. [2]
We use Lewis’s structure to explain the chemical bonding that exists between the atoms present in Nitrogen as well as the placement of the valence shell electrons. Lewis’s structure uses a chemical symbol to represent the location of an atom in a molecular model.
References:
- https://courses.lumenlearning.com/introchem/chapter/double-and-triple-covalent-bonds/
- https://www.britannica.com/science/nitrogen/Properties-and-reaction